Would you like to make this site your homepage? It's fast and easy...
Yes, Please make this my home page!
UPLOADING WEBPAGES
Uploading webpages means "publishing" your pages so other people on the
internet can view them. Publishing a web is basically copying the files from
your computer to a destination, such as a Web server or a disk. ALL the
resources referenced in your webpages must be included in these copied
files.
If you have set up the "skeleton" of folders and files correctly on your hard
drive, you will need to create directories on your server account that
correspond to your folder names, as described in Section 2. You will
also need to upload all HTML and image files into these directories from their
corresponding folders.
In some cases, other individuals may handle uploading for you. In this case,
you probably will save your webpages onto a disk. Alternatively, you can create
a compressed "zip" file composed of your website and send it as an email
attachment to someone else to upload.
If you have to upload webpages yourself, first obtain the address of your
account on the server. Also obtain your password. Carefully note
uppercase and lowercase letters! Record this information and store it in a safe
place for future reference.
Sources for free webspace:
Recommended FTP Software:
- Macintosh: Fetch is a
file transfer program needed for uploading webpages to a server. It is FREE
software for educators, shareware for others.
- Use Fetch to initially log onto your account and set up your directories
and subdirectories.
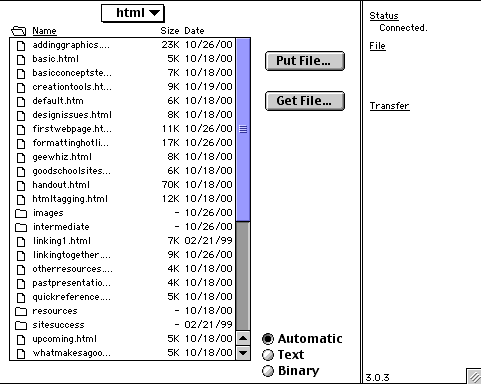
- Fetch allows you to view all the files currently on your server, delete
files, rename files, etc:

 Windows: WS_FTP LE is a
ftp program that is top rated by download.com.
Steps for Uploading:
- Save your webserver account hostname, username, password, and initial path
as a shortcut / favorite in your FTP program.
- Open your saved shortcut to connect to the server.
- Create new directories / folders at the root level of your server
directory as desired.
- Use the PUT / UPLOAD buttons to upload files to the server.
 In Fetch, click PUT FILE to
upload single files, or from the REMOTE menu choose PUT FOLDERS AND FILES to
upload multiple files together.
 In FTP Explorer, once a
directory is created you can drag and drop files and folders from your
desktop into the FTP Explorer window to upload files.
Alternatively you can use Claris HomePage to
upload your webpages and image files. It will ensure all images to your document
are uploaded and that your links are correct.
- First, from the "Edit" menu, choose "Consolidate." This will move all your
image files (if desired) into a single folder.
- From the "File" menu, select "Remote" and then select "Remote Save."
- Enter the information for your server account. This information is
available from your internet service provider. They should provide you with a
domain name and directory pathname, your user name, and your account password.
- Choose to upload image files by checking the appropriate box. All image
files associated with the webpage you are uploading will be sent to the
server.
- Upload each webpage with these same steps.
